Home ....... Galleries....... About Me ....... FAQ'S....... About Me ...... Schedule ....... Contact ....... My Lightbox ....... My Cart ..... . My Account

Friday, February 26, 2010

The Evolution of an Image!

Not too long ago I was shooting film. I would take my film in to be processed and anxiously go pick it up as soon as they said it was ready. Fuji Velvia, a positive slide film, was my film of choice. It was also preferred by most professional nature, landscape, and architecture photographers. Sometimes I miss the sharpness, extra contrast and rich color that you got from looking at a Velvia transparency. Despite all the good things about digital,  matching the look of Velvia is not an easy thing to do most of the time.
Today I shoot everything with a high end, high megapixel camera. I have it set to capture in what they call "raw". This is the image in an unprocessed state. Shooting in raw will give you color and contrast that is dull compared to what you saw and photographed. Many things may need to be adjusted until this image looks the way you remembered it. However, who says it has to look exactly how you remembered it. Neither film nor digital have ever recorded things exactly as we saw them anyway.


 The top image was taken last November on Orange Beach in Alabama. This is how the raw file looks in Adobe Bridge before any type of adjustments have been made. This image is surprisingly dull considering it was about five minutes before sunset and the sun had just popped out from behind the clouds. The light was about as sweet as it gets. Its also has not had any sharpening applied to it.


This second image was processed back in November not long after it was taken. Many adjustments were made with the raw converter in bridge. The image was then opened in Photoshop where some final adjustments were made. The last thing I do is sharpen the image. It may seem strange that it needs to be sharpened. I have a $7,000 camera body with a $1,200 lens attached. I have a very steady tripod and use good technique to create the sharpest image possible. However, this is one of those little things about digital that most people don't realize.

The other day I felt compelled to fiddle with this image a little more. Originally I had opened up the shadows some which is probably closer to the way our eyes see it. However, darkening the shadows and kicking up the contrast brings out more color and accentuates the shapes of the dunes. It dawned on me that this is close the way a perfectly exposed Velvia transparency would have looked. Next time I print "Orange Beach Sunset" I am going with this version unless someone talks me out of it.

Saturday, February 13, 2010

Snowmageddon! New record snowfall for Dallas!

On Wednesday I saw a tweet from Pete Delkus one of the weather guys at channel 8. "snowmageddon is on the way!!!!!!!!!!!!" A few tweets later he said we should get 1"-3". HA! If he had said we would get 10"-12" we would have all thought he was nuts but 36 hours later he would have looked like the weather genius if he had. I woke up Thursday to see that an inch had already fallen. The forecast still called for snow all day. Well, I don't think it stopped until around 2am Friday morning. We ended up with 11.2 inches for the day which broke the old record of 7.8 inches. We must have had another 1.3 inches after midnight which made the total for the storm 12.5 inches. That was also a new record.


Bird Houses on our Fence

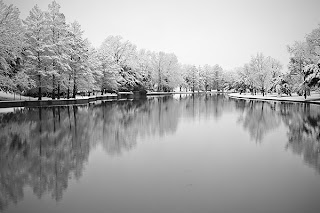
The temperature was at or just above freezing the whole time it snowed. There was little wind and this wet snow stuck to the trees and bushes like crazy. It seemed every little twig had at least 2 inches clinging to it. Bigger limbs had a lot more.The more it snowed the more incredible all the trees looked. Around 11:30pm we noticed that it seemed really bright outside. Much brighter than earlier in the evening and much brighter than when I got up the next morning. The clouds must have been just right so that the lights of the city were reflected right back at us. The front of my house was photographed at 1:45 am. I actually had to darken the exposure some to make it look more like night. The light had such a great quality to it I almost got in the car and drove around to find something else to shoot.

 
My Back yard

  
 My Front yard
I headed out early Friday morning. Fortunately the temperature was still  at 32 degrees and not the 29 degrees they predicted. The roads were slushy but not frozen solid. Driving was not a problem. Everything looked awesome. I first stopped where the road crossed White Rock Creek. I got a few photos of this area where a trail follows the creek. I then got back in the car and headed to Lakeside Park located along Turtle Creek. Many limbs had broken off the trees in this part of town but I was still able to get some good shots of the trees reflecting in the creek. While I was out shooting I heard several loud cracks as another limb broke and fell to the ground. When I got back to my vehicle a limb was now laying in the street about 10 feet behind my truck. The snow was now starting to fall off the trees pretty quickly. I knew it wouldn't last forever. I did get one last shot of a dock at White Rock Lake.

The Trail near White Rock Creek


 Another View of the Trail near White Rock Creek

  
 Turtle Creek

 
Dock at White Rock Lake

Monday, February 8, 2010

Want to combine exposures for a realistic look? Do it this way!

Three or four years ago I first heard about HDR. It was said to be a method of combining a series of different exposures in order to capture a wider range of tones in a scene. This would create an image with more detail in the shadows and highlights, much the way our eyes see things and not the limited range of film or digital. Sounded pretty neat at the time but it was only a little over a year ago that I finally started to learn and use the technique. A Photoshop seminar in the fall of 2008 and a book I purchased both claimed that Photomatix Pro was the best software for this technique and tone-mapping your images was the way to go. Well, tone-mapping has always seemed a little hard to understand and results seem inconsistent. Processing is definitely not over after tone-mapping. Mid tone values usually lack contrast and that needs to be fixed. The Topaz Adjust software seems to fix much of this problem but I usually have to dig a few more things out of my bag of tricks until I am happy with an image. I have also realized that HDR photography is quite the rage now. However it's not a realistic look like I have been trying to get, but a hyper saturated colors surreal look which seems to be the big thing. Nothing wrong with that but not what I want to do with my images and I'm not sure if that was what the HDR technique was intended to be. After all there has always been plenty of plug-ins and stand alone software programs that will take away the "real" look of your photos.
A few months ago I got an upgrade to my Photomatix software. When I opened the updated version of Photomatix I noticed an option for "Exposure Fusion". After blending exposures with it a few times I realized it did a much better job of keeping the image looking natural, real, and believable. I have been considering doing a blog post describing this method but haven't done it up to this point because I knew it would be quite time consuming to do a thorough one. I came across another blog post today which did a good job of describing the technique much as I would have. I have never met Kevin McNeal but he has some of the best wilderness photography that you will ever see. If you go to his blog you can get a rundown of this method of combining images.  http://kevinmcneal.wordpress.com/2010/02/07/exposure-fusion-best-way-to-blend-images/
Some of what I do is a little different than Kevin's method. Like most post-processing techniques there are several ways to get the end result you are looking for. In the next paragraph I will detail the differences in how I do it. I suggest going to his blog and reading it before proceeding here.

 Guanajuato Opera House


The U Drop Inn
 When you choose your source images in Exposure Fusion, you will notice that it says "Note: Blending exposures works with converted files. For good results with Exposure Blending, it is recommended to convert your Raw files into Tiff or Jpeg files." I have taken their word for it and done it that way. I open the raw file that is in the middle of the range of exposures that I have taken. I will make many of the same adjustments in the raw converter that I would if it was a single exposure I was going to use for my image. However, I won't worry too much about the clipped shadows or highlights. The other exposures should take care of those values. I will save it as a TIFF. I then open the other raw files in my range of exposures and make the same adjustments to them before saving. The brightest and darkest exposures may get a small tweak from the adjustment brush if an area needs it. I then choose these images to be Exposure Blended. I will start with the default values in the final dialog box before processing the images. It is easy to get an understanding of what the sliders are doing. A description of what they do comes up when you mouse over them. I have found I can improve the image more by adjusting the sliders. Unlike tone-mapping they don't do strange unreal things to your image if you get a little heavy handed with them. When happy with the way it looks I will tell it to process the image. I then give it a name and save it. I will open it back up in Photoshop. I will then look at the brightest areas of the darkest exposure and see if I think some of the detail is missing from the processed version. I will also look at the darkest area of the brightest exposure and see if it will improve the processed version. If I believe the processed version still didn't retain all the detail in one of these areas then with the move tool I will drag the TIFF image which includes that detail onto the processed version. Dragging while holding down the shift key should line it up perfectly when you let go. I then click the icon for a layer mask while holding down the alt key. This creates a black layer mask which hides the new layer. Then I choose the brush tool set to white with a 10-20% opacity and gradually paint back in the parts of the layer I want to keep. I paint and change the brush size and opacity until happy with the results. I repeat this with another layer if necessary. I will probably make some other small adjustments in Photoshop but the image is usually looking pretty good at this point. I will look at the image and try to decide if it needs something else done to it. If not, its finished.

Saturday, February 6, 2010

A few more from Downtown Dallas!

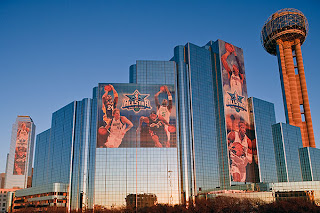
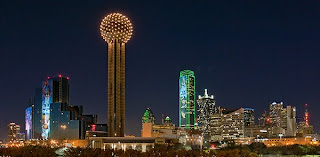
The other day my photos of downtown were all shot from the roof of the parking lot at the courthouse. I still wanted to get some photos that would include all the NBA Banners in one shot so yesterday evening I was back downtown. I took the Reunion Tower image while just 15 feet away from me freeway traffic was zipping past. I would have liked to have backed up a little more. My 24mm tilt-shift lens was given the job of recording this. The shift still could not take all the lean out of the buildings so I had to straighten them up the rest of the way with a perspective fix in Photoshop. The problem with that version was with the Tower. You  obviously were looking almost straight up at it because you can see so much of the underside of the ball. The buildings were straight but the tower still looked strange.  For this version I decided to put a little more of the lean and convergence back in the image, much the way my normal lens would have rendered it.
Reunion Tower and the Hyatt
I still wanted a shot which included the whole skyline but showed all the banners. After looking at the results I think I may have found my new favorite spot to photograph the skyline from. I can see shooting this again at dusk and hopefully having some nice sky to go with it.
Downtown Dallas

Wednesday, February 3, 2010

New way of converting to black and white!

Last week I went to a one day Photoshop seminar in Arlington that was put on by NAPP. One of the things I learned was a different way of converting to black and white. Usually I do this with a black and white adjustment layer in Photoshop. It was suggested at the seminar that I do it in my camera raw conversion instead. While in raw go to the hue saturation luminosity adjustment and convert to grayscale. Then you go back and adjust exposure, recovery, fill light, clarity, and blacks with the sliders. Adjust the contrast with the curves adjustment. I like the results I got here.

Tuesday, February 2, 2010

Getting ready for the NBA All-Stars!

 Dallas Skyline

The Dallas Skyline has had a few things added to it in preparation for the NBA All-Star game which will be played on Feb 14. Several very large banners with pictures of NBA players are hanging from several Downtown buildings. The one in the top image is close to thirty stories high. The Hyatt Regency actually has two on the side of the building but only one is visible in my photo. In the bottom image the banner doesn't appear to be quite finished. After zooming in on it I realized that a scaffold was working on it and the bottom right side of the banner was not all there. I hadn't even noticed it until then.

The Hyatt and Reunion Tower

Unfinished Banner